Tuesday, April 26, 2011

Tenth Australian Narrow Gauge Convention.....

Saturday 23rd and Sunday 24th April the Tenth Australian Narrow Gauge Convention was held at The Workshops Rail Museum where I am employed as the Curator.

It was a most successful event with some 70 delegates, traders and presenters attending.


Christmas Everyday was one of the traders attending the Tenth Australian Narrow Gauge Convention.


Wuiske Models had their latest release available a HOn3.5 model of a Queensland Railways A10 Class 0-4-2

The Railcar was another popular trade stand which was well patronised. The Railcar specialise in narrow gauge models.

Papers presented on Saturday included – “Prototype Freelancing” presented by Gavin Hince, Editor of “Narrow Gauge Downunder” magazine; “The Narrow Gauge World of Suagr Cane” by Dr Lynn Zelmer; “Considerations for Scratch Building” by Phil Badger; “Backdrops – Why and How” by Ian Fainges and “Master Mould Making & Casting” by Dr Grant McAdam to name just a few.
The first session gets under way.

I took a group of delegates on a conducted tour of the Museum’s Collection Stores, not normally seen by the public, during the lunch break.

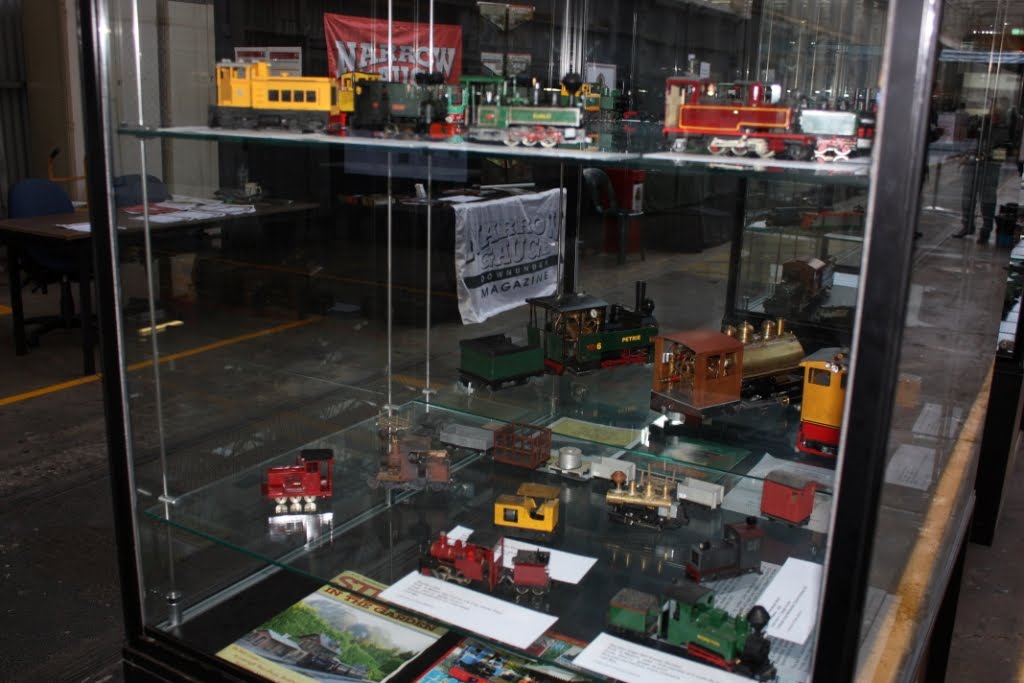
Also on Saturday voting took place for the models in the various categories for the modelling competitions. The Saturday session finished at 5:15 pm when delegates retired to the Museum’s Trackside CafĂ© (formerly the Railway Workshops Dining Room – opened in 1912). Everyone enjoyed some pre-dinner drinks and a chat before sitting down to an excellent dinner served up by the Museum’s caterers – Heritage Catering.
Two of the models entered in the modelling competitions.
Mal Martin's model of a Munro's Tramway Shay locomotive was destined to win the trophy for the Best Steam Locomotive and also took out Best of Show.

The awards for the various modelling competitions were presented to the respective winners before dessert was served. It was a very convivial evening and well worth the cost.

Sunday saw a continuation of the many papers presented by narrow gauge modellers. Dr Grant McAdam presented a talk about “The Lesser Known Narrow Gauge Railways of England and Wales”; “An Introduction to Computer-based Modelling Techniques” was presented by Dr Lynn Zelmer and Clinics were presented by Craig Mackie (a New South Wales modeller but we won’t hold that against him) “How to Build an Outhouse using Styrene” and “Sculpting” (miniature figures) by Ian Fainges rounded out the day.

I again took a group of delegates on a tour of a part of the Museum not seen by the public – the Bogie Shop – where they saw a Hunslet 4-6-0T from World War I amongst other things.
Steve Malone displayed a wide selection of model locomotives he has made.

During the afternoon, I assisted Queensland Railways Workshops staff on a behind the behind the scenes tour of the Railway Workshops. We showed those on the tour B13, C19, C17, B18¼ and B15 Con locomotives that have been in store since 1992 and not available for viewing by the public.

Altogether it was an excellent weekend. Delegates were impressed with the Workshops, the organisation of the event and the papers as well as the food. Morning and afternoon teas were provided as well as lunch each day.

Jim and Ian Fainges also had a selection of their models on display.
Jim Fainges mini-layout Greynite Quarries

On Monday, which was not only Easter Monday but also ANZAC Day, a number of delegates attended the ANZAC Day service at the War Memorial in the Museum grounds. This Memorial was paid for by Railway Workshops staff in 1919 and since then a remembrance service has been held every year. Today it is organised by the Ipswich Branch of the Returned Servicemans’ League, Railway Sub-Branch in conjunction with the Museum. This year the attendance was approaching 1,000 people. The War Memorial at Ipswich Railway Workshops is one of only two on private property in Australia.

On Monday afternoon, John Dennis and his wife, delegates from Melbourne at the Narrow Gauge Convention, visited my home to view some of the historic research files I hold about narrow gauge railways in Australia as well as to view our On30 layout in The Shed.

To round out a great weekend, Raymond and I did some more work on our layout today (Tuesday) which was a public holiday in Queensland. Raymond has wired up and installed another three points. Slowly but surely.

Sunday, April 17, 2011

Some Problems Solved.....

Last time I posted I mentioned we had a major issue with some locos stalling as they went through the points. We had other, more serious problems as well. This was the current draw with the six sets of points fitted with Cobalt motors and decoders. For some reason we had a high current reading on the NCE-ProCab controller. This controller has the ability to give an amp reading. With all the pointwork and track powered up we were getting readings of 1.25 amps. We should have been getting something less than 0.09 amps. Tuesday evening was the fortnightly meeting of the Tuesday Nighters. This meeting took place at Warren’s down at Shailer Park. There was considerable discussion about our two problems amongst the guys. Darren and Craig made several suggestions which we decided to try during the week. We also decided to contact the supplier to see if he could shed any light on the issue. We tried testing the decoders and point motors in many different wiring combinations and also successively cutting out various decoders and point motors out of the system each time taking note of the current draw. Despite many suggestions by e-mail we were not having any luck with a reading of 0.25 amps being the lowest we obtained for a single decoder not attached to anything other than having power in and power out. We were stumped! Raymond thought he had found the problem with the stalling by certain locos going through the points. The Davenport 0-4-0D still stalled but most of the other locos seemed to pass through relatively easily. The “fix” apparently wasn’t totally satisfactory. Craig has told me I should refer to the UTP panel as the PCP panel, so I will try to do this in future. I also mentioned “suitcase connectors” in my last report which Raymond had bought from the US. They are more properly referred to as IDC or “Insulation Displacement Connectors” which eliminate the need to strip and solder wire joints. You just use a special connector clip with a crimping tool which bares the two wires and locks them together in the connector clip thus eliminating the need for soldering. Saturday, 8 April we went for our usual Saturday morning visit to Austral Modelcraft. Here we purchased an NCE SwitchIt Decoder to try out in place of the other points decoders we had. The next day, Raymond installed the SwitchIt and connected it to two of the points (103 and 104 on the Diagram) in place of a previously installed decoder. Craig (Cassino) came over that afternoon to check out the decoders we were having trouble with. Craig tried different wiring to the various decoders and confirmed the high amperage we had been getting. Raymond was watching the amp levels while Craig was under the layout. We then turned our attention to the NCE SwitchIt Decoder. Together Craig and Raymond set the CV address on points 103 and 104 and then tried changing the points using the NCE hand throttle. It worked!! The current draw was only 0.01 amp as well. This was most satisfactory. Raymond had fixed the polarity problem he had had through the point frogs which had been causing the locos to stall. We could now run the Ixion Coffee Pot, Bachmann Davenport 0-4-0DM, MMI K-37 and a Bachmann Shay through these two points at the slowest of speeds without any hesitation by any of these locos. It looks like we now had the problems solved. Saturday, 15 April, I called in to Austral Modelcraft to pick up some more NCE Decoders. We wanted an NCE Switch-8 but Ray did not have any so I bought three more SwitchIt Decoders while Ray put the Switch-8 on back order. Sunday 16 April we (Raymond that is) installed two of the SwitchIt Decoders to three more points (107; 109 and 110). He had some difficulty with getting the polarity through the points set properly but resolved the situation after a few choice words and a bit of tinkering. Raymond had a pounding head-ache which did not help his concentration much. We test ran the Bachmann Davenport 0-4-0DM, MMI K-37 and a Bachmann Shay through the five points we now had wired with excellent results. At speed setting one the Shay took forever to travel at its slowest speed with no hesitation through the pointwork. The Bachmann Shay and a log train trundles along the layout MMI K-37 No.499 stands on a siding We are rightly pleased with our progress but are still stumped at the unusually high current draw by the non-NCE decoders. Also attached to this Blog is a diagram of this first section of our On30 empire which will show the point numbering. We intend to finish the trackwork in the yard and then tackle the scenery on this section before extending the baseboard structure and constructing the next section of track.

Track Diagram


Like Craig in his Blog (Craig’s Shed) I have been preparing for the 10th Australian Narrow Gauge Convention to be held at The Workshops Rail Museum over Easter Weekend (Saturday 22nd and Sunday 23rd April). My two papers will deal with prototype narrow gauge in Queensland so this will be a busy week as, although the papers themselves have been completed, I have yet to put together the Powerpoint programs.


It is Tuesday Nighters this Tuesday night to be held at Peter’s home at Robertson. Raymond and I are looking forward to telling the guys about our progress and how we overcame our decoder problem.

Sunday, April 3, 2011

And We Have Lift Off.....

Well we finally have “Lift-Off”. No, not lifting rolling stock off the track. We actually have power to The Shed layout for the first time. And who are those doubting Thomas’s who said it would never happen! During the past week Raymond has separated the black main bus wire from the red and installed suitcase connectors to connect the dropper wires from the track rail to the black main bus wire. The suitcase connectors eliminated the need for stripping a section of the wire and soldering. Raymond purchased a quantity of suitcase connectors and a special pair of crimping pliers from Micro-Mark in the United States. The suitcase connectors work out at less than 45 cents each. He has found installing these so much easier than soldering, although soldering in other areas is still required. Sunday morning 3rd April he has wired up the six point motors he has already installed and connected them to the main bus wires. I installed a length of 4 X 1 between two of the baseboard supports and installed the UTP panel. Raymond has then connected the main bus wires to the UTP panel. Raymond found the clips used to hold in the wire on the Cobalt point motors very difficult to use. The wire always seemed to want to pop back out after being “locked” in place. Either we are doing it incorrectly or it is a problem with the wire or the connector.

Three of the Cobalt Point Motors and four of the DCC Modules which control the points. You can make out the orange buttons which are pushed in to allow the wire to be installed and then released to hold the wire in place. The wires into the green terminal strips on the bottom of the DCC Modules are held in by the screws which can be seen at the very bottom of these terminal strips.


Power was then turned on. Programming of the six point motors was next. Most worked okay first time but two of the motors would not respond. Raymond tried reconnecting the wiring several times and eventually they came good but this continued to highlight issues Raymond has with the non-soldered joints into the motors. In the photo of the three Cobalt motors you can see the orange push-buttons clearly on the middle motor. You push these in as required and insert the appropriate wire into the hole then release the orange button. Theoretically the wire should now be held firmly in place. In practice we have not had great success with this technique. The wires seem to easily fall out or are easily pulled out meaning we have not got a good electrical connection if the wires are not secure. We then ran a Bachmann 2-8-0 along with a couple of AMS box cars and a Bachmann flat cars up and down the wired track. This was our first train operating almost the full length of this first section of the layout. We tried it through the crossover and onto the passing loop in the Depot area. The train worked smoothly through the points and the curves. It appeared we had been successful. But this was not to be the case. Raymond starts off the first train. The Bachmann 2-8-0 which worked the first train


The second train still using the Bachmann 2-8-0. It ran very smoothly and we detected a few humps in the track.


We tried an MMI K-37 light engine and found that it would stall on one set of points every time. We ran it in reverse onto the Depot passing loop and it stopped on each set of points through the crossover and onto the passing loop. Running forwards it was fine through the crossover (mostly) but stalled on that same set of points leading into an industrial siding off the main line. Frustration!!@@####


MMI K-37 No.499 loco ran well except for some problems at point frogs.


This was a problem we had had with the garage layout but these Peco Electrofrog points we had modified as per DCC Concepts and Peco’s instructions. We also tried a Bachmann Davenport 0-4-0DM but it stalled on every set of points. This, obviously, is a major issue but we have yet to determine the precise cause. We also have dropper wires under the rails at a couple of locations making humps in the track. These sections of track will probably have to be pulled up and relaid. Raymond has decided that we will in future solder the dropper wires under the rail but face it out to the side then down through a hole in the baseboard rather than through a hole directly under the rail. I also think we should make the hole slightly larger giving more room for any slight errors in lining the hole up with the dropper wires. Raymond says "We are now at the fine tuning stage".