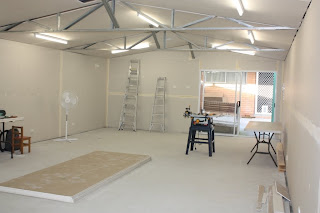


One problem I found was that there was no timber suitable to put under the trusses. The steel truss was 80 mm wide so we needed timber 100 mm wide. The pine dressed timber went from 90 mm wide to 110 mm. We needed to cut off a 10 mm strip. I made many enquiries to timber suppliers without much encouragement. I decided I would need to purchase a bench saw that would do this task but then baulked at the cost. Eventually, I decided to purchase a Ryobi Bench Saw which was on special at Bunnings for $389. I had convinced myself that it would come in handy during the construction of the layout as well as for the trusses in the shed. Raymond and I took a weekend to put it together – something akin to an item of Ikea furniture. We took another afternoon on a following weekend to install an 80 teeth blade in place of the 40 teeth blade the saw comes with. I have nicknamed this fearsome looking contraption "The Beast".
Queen’s Birthday long weekend Raymond and I thought we would be able to get the three roof trusses done. It was not to be. We took two and a half days to install the plasterboard on just one truss and in doing this work I fell off the ladder and Raymond tore a tendon in his foot.
The day following the public holiday I made a distress call for help to our home handy man, RayM, who offered to come the following Tuesday to do the work on the trusses.
On Tuesday 22 June RayM duly arrived at 7.30 am. By lunch time he had sheeted the remaining two roof trusses with plasterboard, put 100 mm wide timber under each of the five steel angle braces and sheeted all five with plasterboard. While we were having lunch RayM says to me “You certainly made a fine fist of the plastering. I don’t want to knock all the hard work you have put in BUT you haven’t done it correctly. I’ll show you how it’s done after we have lunch.”


After lunch, suitably chastened, I watched as RayM sanded down all the joints around the walls (except the four corners) then applied the second coat of plaster over the smoother surface. “That”, he says “Is how you do it”. I looked at his handiwork. “Smooth as a baby’s bum” I thought.
He had completed all four walls in just under 3 hours. I had taken days to do the same task and not to as high a standard.
I now only have to sand the first coat of plaster on the four corners and the ceiling and then apply the second coat, although RayM promised he would come back to do it if I was not confident. Once the ceiling and corners are redone, we agreed that he would come back to put the final coat of plaster on the whole shed.

Could you tell me the breakers that have been used in the power board
ReplyDeleteYour blog has quickly become one of my favorites, and this article is a great example of why. It was informative, engaging, and well structured. I appreciate the clarity you bring to complex subjects. Keep up the amazing work—I’ll definitely be returning to read more of your content.
ReplyDeleteOkoume Plywood vs. Other Plywood Types: Which One Should You Choose?