Wednesday, December 29, 2010

Stage 1 (You're Not Going to Believe This) Part 2.....

Raymond received another parcel from overseas on the 23 December. This one came from EDM Models in York. It was a five-pack of wooden drop-bottom ore hoppers made by a new manufacturer in the US – Prairie Locomotive Works. A dozen or more of these vehicles on the layout will look exceptional. They are highly detailed and run well.
A PLW wooden bodied ore hopper. A nice model that runs well.

The five ore hoppers behind a Bachmann Forney.

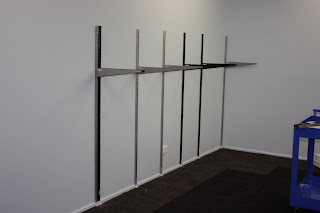
Christmas Day came and went with lots of family activities. On Boxing Day, Raymond and I installed the remaining seven double-slotted steel tubing and brackets along the left hand wall.
The two double-slotted steel channel sitting close together just for those doubting Thomas's (alias Cassino). This is where two lengths of L-Girder meet.

All 14 double-slotted steel channels now installed giving a length of 23 feet along the left-hand wall.

A 7 ft square section will be added to the left hand end of these channels making it 30 feet along the left hand wall. This 7 ft square section will contain the helix to connect to the future lower level while on the top there will be a fork line and pssibly some other sidings.

On Monday 27 December we cut two lengths of the 4 X 1 pine and another two lengths of 2 X 1 from the 5.4 metre lengths into 2 X 2.9 metre lengths of each and then repeated the process with another two lengths of 4 X 1 and two of 2 X 1 into 4.16 metre lengths. We then used these pieces to make some L-girders for the top deck.


The L-Girders for the top deck in place

Another view of the L-Girders for the top deck from the right hand wall.

Tuesday, 28 December we cut up some more of the 4 X 1 to give us 10 X 750 mm lengths. We need another two to finish the requirements for the top deck.
Ten of the 750 mm long 4" X 1" cut and in place but still to be screwed in. There are another two of these required to be cut to finish this 7 metre long section.

We have a serious problem with black ants in the shed. These ants are slightly larger than the tiny hi-speed ants we have seen previously. They seem to be everywhere with a couple of serious hotspots with hundreds of the little ba@#%&*sds. They are crawling along the ceiling on the left-hand side of the shed in a massive convoy and then down to the floor behind the kitchen cupboard. We've found them on our work benches. They can get into the electronics and the formic acid they exude can destroy circuit boards. We had noticed a few ants around near the ceiling on previous days but Tuesday was very bad with the convoy up the wall to the ceiling then along before disappearing in a slight hole in the cornice. We also noticed many more ants "scouting" the shed. They were obviously very active because of the extreme wet weather we have been having.We will need to get our friendly pest exterminator to zap them.

Monday, December 20, 2010

You're Not Going to Believe This.....

The weekend of the 11th and 12th of December was a bit of a non-event. We had our usual visit to Austral Modelcraft where we both purchased a few second-hand items of On30. Raymond bought a Bachmann On30 Climax fitted with DCC and sound and a couple of wagons while I got a couple of C&S boxcars.

On Tuesday, 14 December we received a delivery of 4” X 1” and 2” X 1” timber and the next day three sheets of 12 mm plywood was delivered pre-cut into 3 X 2400 mm lengths at 750 mm wide and the balance of 3 lengths at 450 mm wide.

The 4 X 1 and 2 X 1 along with the three lengths of 750 mm wide plywood is intended for the construction of the upper deck down the left-hand side of the shed.

On Tuesday evening the Tuesday Nighters (alias Mackie’s Marauders) came over for an inspection and our usual bull session. They were suitably impressed with progress but disappointed we didn’t have any baseboard under construction or track down yet.

On Friday, Raymond received his latest purchase in the mail. This is an On30 model of the Coffee Pot steam railmotor preserved in South Australia. It came from Ixion Models and is an absolute gem. The detail is superb. Raymond bought a TCS DCC chip the next day at Austral Modelcraft. It is plug’n play and he had no trouble fitting the chip and test running the model on the garage layout.
Ixion Models Coffee Pot stands on our garage layout. A superb model with a fully detailed cab and interior of the coach. Electrical pick-up is the four wheels on the loco and the four wheels at the rear of the coach.
While we were at Austral I purchased a Bachmann On30 2-6-6-2 fitted with DCC and Tsunami sound. I had had this loco on order for several years since the model had been announced. This was the first shipment Austral had managed to get.

Now, are you sitting down because you are not going to believe this. On Saturday afternoon Raymond and I installed seven of the double-slotted tubing sections and brackets along the wall on the left-hand side of the shed. This is the first stage of the baseboard construction. We installed seven sections of tubing in next to no time with another eight to go. We can then start using the 4 X 1, 2X 1 and plywood. I start holidays on Thursday and go back to work on the 4 January so Raymond and I plan to have this section of baseboard up and track-laying commenced before I go back to work. Amazing – isn’t it?
Ground breaking. The first double slotted steel tubing and bracket fully installed.

The first seven double-slotted tubing and brackets installed. Only another eight to go along this wall and would you believe it? The brackets are all dead-level in line with each other.
The AMRA Narrow Gauge SIG Group will be visiting here tomorrow night (Tuesday 21 December). We hope they will like what they see and how The Shed has progressed since they last came over.

Sunday, December 5, 2010

More On30 Kits.....

Raymond received another two packages from the United States during this past week. The first arrived on Monday 29 November from a laser kit manufacturer called Raggs to Riches. Joe Fuss and his wife make a large range of narrow gauge laser cut kits. They sent a nice personal note to Raymond about the kits he had purchased. Both Raymond and I are keen to have a go at quite a number of their kits although Raymond is the only one of us who so far, has the money available to buy them. They are certainly not simple kits rather they would be termed craftsman kits.

This parcel contained the Dolores Oil Depot. It is based on the Continental Oil Company (CONOCO) Depot in Dolores, Colorado.

The box containing the Dolores Oil Depot with the instruction book.

The second kit was a model of the two-stall Ouray Engine House located at Ouray on the Colorado narrow gauge. There was a third box which contained numerous items to detail inside the engine house.
The Ouray Engine House box and instruction book

The box of detail parts for the Ouray Engine House.

More detail parts for the Ouray Engine House.

A list of the detail parts for the Ouray Engine House.


On Friday, 3 December a box arrived from Stoney Creek Models containing a laser cut and Hdrocal kit of a scrap yard. Besides the scrap yard itself there are heaps of details parts included.
The Scrap Yard kit supplied by Stoney Creek Models

Inside the Stoney Creek Models Scrap Yard kit. Note the CD of instructions.

Raymond reading the instructions for the Scrap Yard Kit.

Despite buying a few items from overseas we are very strong supporters of our local hobby shop – Austral Modelcraft. The items purchased from overseas so far are not available in Australia as we feel it is silly to ask a shop to order one kit as that is all they are likely to sell. Gerry Harvey (Harvey Norman) and some other retailers are making a lot of noise about people buying “on line” and no doubt there are many who take advantage of the high vale of the Aussie Dollar and low cost of importing CDs and books from overseas when compared with local prices. As I have said we have purchased items that are just not available in Australia. EDM Models in the UK and a couple of other small kit manufacturers only supply by mail order. The Government has had a long standing policy of allowing items such as this to a value of less than $1000 into the country GST free. The cost and workload to value and calculate GST on these individual items and then collect it would be astronomical. If some retailers get their way all items purchased overseas will be slugged GST and possibly import duty as well.

Saturday, 3 December, Raymond and I went to Austral Modelcraft where Raymond purchased another ten N Scale freight wagons while I (believe it or not) purchased a 12 pack of Cobalt point motors ready for that layout we keep talking about building. Raymond’s collection of N Scale freight vehicles has now reached almost 400.

We spent Saturday afternoon in The Shed having a cold beer and brainstorming some ideas for the layout and scenery. I am currently making a list of the plywood and timber to start construction of the framework for the layout. We want to have this delivered before Christmas so we can start work.

Sunday, November 28, 2010

Now for the Kitchen Sink.....

On Saturday 20 November, we again called in to Bunnings at Mansfield. This time we purchased another ten sets of double slotted steel tubing and ten 470 mm brackets. This gives us a total of 15 double slotted brackets and tubing which will allow us to build the top deck of the layout down the left hand wall of The Shed. We also purchased some bolts with which to affix the tubing to the wall studs but these ended up being too short, Bunnings did not have the range suitable for our requirements. I will try a fastener specialist to see what we can get.

The double-slotted tubing and a bracket purchased for the first stage of our layout. The bracket is 470 mm long and will support the top deck on the left hand side of the shed at 750 mm width

Our next stop was our usual Saturday morning visit to Austral Modelcraft where we received a rather boisterous greeting as besides Ray and Aileen there were a number of the Tuesday Nighters present. GeoffB, MikeB, Tess and Son were there and they gave me a rather “warm” reception. I thought it must have been “get David day” with all the jibes. Fortunately, Craig wasn’t there as it could have been a riot (at my expense).

Raymond purchased some more HO Scale flat car loads. He had purchased some pipe loads previously and they do not look out of place on an On30 flat car. He now has some slab steel. They cost $29.95 and $27.95 respectively from Austral Modelcraft.

A Bachmann On30 flat car with a pipe load. The slab steel is in the foreground.

We spent the rest of the weekend tidying up and planning future action.

Raymond spent some time installing a DCC sound chip and speaker in my K-36 but when he tested it, it blew the chip. Much to his chagrin he found that the wheels on the tender of the loco were not installed correctly giving a direct short circuit. Oh well, another couple of hours work and a new chip when he gets around to it.

My K-36 No.481 disassembled ready for a second attempt to install a DCC sound chip.

On Saturday 27 November we again went to Bunnings at Mansfield. This time we purchased a mobile tool trolley which was on special. We plan to use this when we are building the layout to keep our tools, screws and sundry bits and bits together. We can wheel it around The Shed as we progress. Our Saturday morning visit to Austral Modelcraft was next where Raymond purchased some wiring harnesses and Tamiya weathering pastels. I thought it was rather quiet even though there were several other customers. Oh! I know the Tuesday Nighters weren’t there.

On Saturday afternoon, Raymond assembled the tool trolley then he set about making the kitchen cupboard. Neither took that long to make although Raymond kept muttering something about Ikea when he was making the kitchen cupboard. I said “But there are no Allen keys so it can’t be Ikea”. Actually it was a Bunnings product.
The Tool Trolley
The kitchen cupboard unit is now in place with a 5 litre urn ready for lots of tea or coffee when the guys come around. I am hesitant to put in a mini bar fridge as well just for milk (and a few stubbies of beer) as we have a fridge nearby in the laundry already loaded up with milk, beer and even some wine.
Well not actually the kitchen sink. This is our kitchen cupboard with the 5 litre urn ready for cups and teaspoons. We will be able to enjoy a nice cup of coffee.

Sunday, November 14, 2010

Not the Kitchen Sink.....

On Saturday 13 November, we called in to Bunnings at Mansfield to purchase another two sets of shelving and a kitchen cupboard unit. We then went to Austral Modelcraft where I spent some time drooling over what I might buy (but couldn’t afford) while Raymond opened his Debit Card to purchase two N Scale Kato SD45’s in Rio Grande colours and a 1:20.3 Bachmann Spectrum Long Caboose in Rio Grande Southern colours.

Saturday afternoon we spent in The Shed assembling the two sets of shelves. The assembly itself was very quick. I then started transferring our modelling magazines to one of these while Raymond moved some more of his stuff to the other.
A second set of storage shelves which Raymond has started to fill.

We have a large collection of Australian Model Railway Magazines but our collection of narrow gauge magazines is growing very fast too. Titles include Narrow Gauge & Shortline Gazette, Narrow Gauge Downunder, On30 Annual and Narrow Gauge and Industrial Modelling Review.
The library shelves for our modelling magazines. I have already started to fill these up.

Raymond also spent some time testing his MMI K-37 which he has fitted with a speaker and DCC sound chip.

Last Sunday Raymond went to fit sound and DCC to his MMI K-36. After he had dismantled it he found some serious rusting on the end of the can motor. There was also corrosion on a number of soldered joints as well. He e-mailed Precision Scale Company in the USA on Monday and had a response by Tuesday. He had told them of the problem and included a photo. He told them we had two of these locos. Their reply was to check the second loco and that they would send out one motor or two if necessary. My K-36 was fine except for some corrosion around some of the soldered detail parts. PSC are now to send out a replacement motor for Raymond’s loco.
The brown rust on the end of the can motor of the MMI K-36. Precision Scale Company responded very quickly to this problem.

Raymond has also started to fit a DCC chip to a Bachmann Porter 0-4-2T. The number of complicated parts and sub-assembles that this loco has to be broken down to is unbelievable.
A dismembered Bachmann Porter 0-4-2T. A myriad of parts for such a small loco.

We have yet to put together the kitchen cabinet unit, perhaps next weekend.

Sunday, November 7, 2010

Work Benches and Storage.....

Raymond and I purchased a set of shelving from Bunnings, Browns Plains on Sunday 24 October. Raymond went out Sunday afternoon so I tried to assemble them myself but was severely hampered by my wrist. Raymond helped put them together on Saturday 30 October. The task took us about 15 minutes unlike the bolt-together shelving I had used in the garage which would take several hours. This shelving kit makes up into a very nice sturdy piece of furniture with five shelves. The only tool needed was a rubber mallet as it was all clip together. Once assembled it is very sturdy unlike the bolt-together shelving I had bought previously for model railway storage in the garage. After assembly we spent a pleasant couple of hours transferring more than 100 boxes of Bachmann On30 models from the garage to The Shed. There are still more to go but we can’t get at them as there are four full sheets of plasterboard, left over from The Shed leaning against those shelves in the garage. I have offered to give the plasterboard away to one of the Tuesday Nighters so we can get it out of our way.

Our first set of shelves in The Shed loaded with some of Raymond's Bachmann collection
Raymond still has a lot of boxes to go but we need the next set of shelves for those. By comparison my collection appears rather sparse.


My collection of Bachmann in the green boxes. The red boxes on the right are the AMS wagons that Raymond bought from the UK recently. The wooden carry trays are Raymond's also.

We are planning to purchase at least two more or possibly three of these clip together shelves. We need at least one more for the remaining On30 boxes, one for our library of model railroad magazines and hopefully another for all the kits and bits and pieces.

On Saturday 30 October we called in to Wallace’s Office Furniture at Annerley where we purchased two new office desks each 1500 X 750 mm plus two second-hand mobile drawer units to fit under the desks. These were delivered on Thursday 4 November and Raymond had them placed in position. We are now planning to build some shelving at the back of these desks (work benches).
Our two work benches in place along with the mobile drawer units

This weekend Raymond and I repaired the drawer runners on one of the second-hand drawer units. We then spent a pleasant Saturday afternoon starting to move our modelling tools and various models under construction. At the same time we began discussing the shelving we thought would be desirable on the top of the work benches in order to organise all our tools, paint, glue and spare parts including DCC chips, speakers, lighting, couplers and detail parts. This is Fun.

Setting up the work area
There will be some things that we can’t/won’t do in this work area. Spray painting and drilling and machining metalwork will be done just outside The Shed under the Pergola. It will be too hard trying to vacuum metal shavings out of the carpet. Walking on the soft carpet in bare feet is a pleasure to the senses although one of us will probably step on something sharp one day. Ouch! I suppose we will have to wear good quality sneakers or slippers when the Tuesday Nighters come over. We do need some decorum.

Looking from the back of The Shed. The blue chairs and table are for our Tuesday Nighters meetings but will be moved once the layout is under construction as the layout will extend that far. The Pergola area can be seen through the sliding glass door.
Raymond started putting his work area to good use this Sunday afternoon by wiring in a DCC sound chip and speaker into an MMI D&RGW K-37. Sounds great but there are a few hiccups to deal with especially the lighting.

Sunday, October 31, 2010

Now for some Modelling.....

It has been a while since my last post mainly due to a lack of work in The Shed because of the issues with my wrist. I have finally been given the OK to start driving again. This was a great boost for my morale but the physiotherapy sessions have been slow and painful. This last week (commencing 25 October) I have started going to a local gymnasium to strengthen my hand, wrist and arm. My first session at the Gym was with a physiologist who worked with me to set up an exercise regime. I went to the Gym a couple of more times during the week. I have to see the physiotherapist and the physiologist on Monday 1 November.

Since the beginning of this whole saga Raymond and I have been accumulating more locomotives and rolling stock, as well as various kits for buildings and rolling stock.

Raymond has a larger disposable income than me. Well!! Actually I have a large disposable income too but it is already committed for things like, rates, water, electricity, food and all those mundane things. Ever since I had started work I always lusted after buying more locomotives, rolling stock and other things, but could never afford them as I had other commitments – women, buying a car, women, going on holidays, a wife, buying a house, a wife, having a family, a wife, sending the kids to school, a wife – it seems to never end. This situation has always plagued me and now, just to break the monotony – a broken wrist which is costing me a fortune in medical expenses and other sundry costs. It is not just the medical bills which have racked up more than $5,000 in out-of-pocket expenses but train and taxi fares (when i was not allowed to drive) amounting to about $15 and up to $20 per day as well as more expensive “easy cook” (frozen) food as I can’t prepare meals like I used to.

Raymond has started buying from overseas through the internet – something I would like to do. On Thursday 30 September he received eight On30 boxcars by AMS. These came from EDM Models in the UK at a cost of Stg£256 plus postage.


One of four AMS D&RGW Box Cars that Raymond bought from EDM Models in the UK

Along with four Colorado & Southern Box Cars

The detail on these cars has to be seen to be believed. They are stunning models although the knuckle couplers on these do not seem to work too well. Raymond has plans to change them for Kadees.

Raymond also received an order of 38 packets of Evergreen strip styrene from M B Klein in the USA through our good friend PK. Raymond has built up quite a large varied stock of styrene and stripwood to aid in his scratch building. Craig also finds Raymond’s stockpile useful when he runs out of a particular size, during his Cassino model building projects

Some time ago I purchased a Walthers O Scale Built Up building – Melissa’s Eastside Diner. It is quite a nice 2-story brick building which I would like to turn into a bank downstairs and a solicitor’s office upstairs. The building is already assembled with pre-coloured plastic parts.
Melissa's Diner one of Walthers Cornerstone Series of pre-built kits

However, the brick work was a horrible mauve hue which did not look like bricks at all. I purchased a selection of Semco acrylic paints from Spotlight. These 60 ml bottles are good value. I washed the building in warm water with a mild detergent then thoroughly rinsed it before applying one coat of Semco flat Potters Clay, allowing it to dry and then applying a second coat. I have tried painting the concrete sections with Semco flat Bisque but more work needs doing here.

Melissa's Diner in its initial state straight out of the box

Melissa's Diner after two coats of Semco Potter's Clay.

I tried painting the timber trim around the bay window with Semco Raw Sienna but this has not worked well. I wanted a dark brown and as I have so far only applied one coat it is very streaky. All this was done prior to breaking my wrist. It requires a steady hand so I am hoping my hand will repair itself sufficiently firstly so I can hold a brush and secondly that it does not shake (as it has been during my physio sessions).

I have purchased a bottle of gloss Cocoa Brown by Aqueous Hobby Colour and also a bottle of gloss Green. The Cocoa Brown is for the bay window and the Green for the window frames and doors instead of the Semco paints. We'll see how this develops.

Raymond got some more goodies from overseas on Thursday 7 October when two locos arrived from MicroMark in the United States. It is a Bachmann On30 Mallet
2-6-6-2 fitted with DCC and Tsunami sound. It looks and sounds good. The other loco is an inside framed 4-4-0.
The Bachmann On30 2-6-6-2 Mallet. It looks and sound good but very tiny.

Well, I think (hope) that things are starting to progress more positively now so this Blog should appear more frequently. I would like to bring it out once per week like Craig (Ca55ino) does for his.

Sunday, September 5, 2010

Finally The Shed is complete.....

Well, we have caught up with the present. The Shed was completed last Tuesday, 31 August, when our handyman, RayM, came to install the skirting board and then laid the carpet tiles. The project started in February 2008 with the contracts for the new veranda and The Shed. The Shed itself saw the turning of the first sod in May 2008. So it has taken 27 months to complete.

All the building material and other bits and pieces have been removed. We now have a 12 metre X 6 metre space to start meaningful work on our new layout. We first want to put in a double length work bench/table adjacent to the sliding door so that we can have all our modelling tools together and get "stuck into" the many modelling tasks we have started or that are awaiting our attention. This work bench will be long enough for both Raymond and I to be doing modelling work at the same time without each intefering with the other. We also want to install some shelving so that we can store all our On30 models currently stored in the garage and in my study area. The shelving in the garage will then be turned over to the Garden Railway rolling stock and the N Scale will be stored in the cupboards in my office.

I had hoped we could have started this this weekend but it was a false hope. I can do little with a broken wrist preventing me from shifting anything and Raymond has been doing other things as usual. I cannot even open the sliding door to The Shed as it takes two hands.

The Tuesday Nighters are coming this Tuesday night and I cannot even get ready for them. Mackie's Marauders will find a big difference.


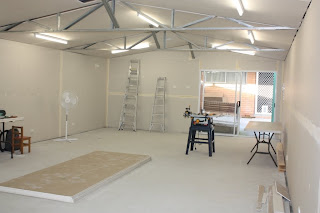
Looking from the back corner of the shed towards the sliding door. The work bench will be installed to the left of the glass door. Yours truly is standing in the doorway. 2/09/2010

Looking from the doorway to the back of the shed. The first section of layout to be built will be the upper deck along the left-hand wall. 2/09/2010


Wednesday, August 4, 2010

We Arrive at the Present - Almost.....

Over the weekend of 17 – 18 July we sanded back the plaster on the ceiling joints and in each of the four corners then applied the second coat of plaster. My future son-in-law, AJ came around both days to help. Actually he did most of the work while I watched and helped where I could. The bronchial-asthma was playing up again.

On Tuesday 20 July our reliable home handyman, RayM came to apply the top coat of plaster. Well, we had done it again. In our efforts to create a smooth finish we were taking off too much plaster and so RayM had to apply extra plaster in the top coat to make up for it. Anyway, by the end of the day he had achieved an excellent smooth finish.

The following weekend, 24-25/7 Raymond and I did a few odd jobs around the shed as RayM was coming back to install the timber mouldings around the ceiling before starting to paint the shed. Raymond was to work from home but things don’t always go according to plan and sometimes they can even go devastatingly wrong.

Just after lunch Sunday, I climbed the step ladder to take a few measurements. On coming down again, I missed my footing and fell awkwardly. I was in major pain as I had broken my right wrist. Pauline came and took me to the Mater Private Emergency Clinic. We spent more than 6 hours there having the wrist reset twice, X-rays and CT Scans and then to be told I would need surgery as it was a very bad break. I was referred to an orthopaedic surgeon on Tuesday 27 July and admitted to a private hospital at Everton Park on Friday 30th. Surgery took over three hours. I was kept in overnight and arrived home again about 3.0pm Saturday afternoon. I have been told I will be “out of action” for up to six months. I have physiotherapy sessions starting on Monday and have been told I will not get full functionality in my wrist again.

On a brighter note RayM came out again on Wednesday, Friday and Saturday morning of that week to complete painting the shed. All that remains is to put on the skirting board and install carpet tiles. It certainly looks a treat. This has cheered me up somewhat despite the severe pain in my wrist. I will have to get Raymond to take some photos to put up with this post to my blog.

Friday 27 August - It has taken me a long time to get around to posting this update. My broken wrist has left me feeling rather helpless and depressed. I am grateful to the Director of The Workshops Rail Museum and other staff for their support and in assisting me to get back to work during this past week. I still can't drive and the Director and other staff go out of their way to pick me up and drop me home. It has been good therapy but today I am suffering some considerable pain in my hand so will go to the physio to see what is going on.

I must also thank Ca55ino and the Tuesday nighters for their support and also members of the worl-wide newsgroup Railroad Line Forum. The On30 people from the USA, UK and Europe are a great bunch.

RayM is coming back this coming Tuesday to install the skirting board around the room and, hopefully put down the carpet tiles which Raymond has bought. We went for the thicker, cushioned style which gives a nice soft feel under foot on the concrete floor.

To finish off today here are a couple of photos of the painted shed that Raymond took on the 9 August.
Looking down the length of the shed. It is intended the model railway will occupy the area from the back wall as far as the truss which can just be seen at the very top of the picture. 9/08/2010

Looking towards the front. The area to the left of the door will be occupied with our modelling workbenches. This will be single bench but long enough for both Raymond and I to have our own work spaces. The rest of that front area should be sufficient for chat sessions for the Tuesday nighters. 9/08/2010

Sunday, July 18, 2010

The Shed progresses.....

I now started purchasing timber moulding strips to finish off the shed after everything else (plastering and painting) was done. Our plasterer had also suggested we buy some timber strips to screw under each truss to support the 10 mm thick plasterboard.

The shed complete except for sheeting the trusses with plasterboard. 26/04/2010

Another view of the shed with the plasterboard on the wall and ceiling complete. 26/04/2010

The power board near the door into the shed. 22/04/2010

One problem I found was that there was no timber suitable to put under the trusses. The steel truss was 80 mm wide so we needed timber 100 mm wide. The pine dressed timber went from 90 mm wide to 110 mm. We needed to cut off a 10 mm strip. I made many enquiries to timber suppliers without much encouragement. I decided I would need to purchase a bench saw that would do this task but then baulked at the cost. Eventually, I decided to purchase a Ryobi Bench Saw which was on special at Bunnings for $389. I had convinced myself that it would come in handy during the construction of the layout as well as for the trusses in the shed. Raymond and I took a weekend to put it together – something akin to an item of Ikea furniture. We took another afternoon on a following weekend to install an 80 teeth blade in place of the 40 teeth blade the saw comes with. I have nicknamed this fearsome looking contraption "The Beast".
"The Beast", the Ryobi bench saw after assembly. 26/04/2010

Queen’s Birthday long weekend Raymond and I thought we would be able to get the three roof trusses done. It was not to be. We took two and a half days to install the plasterboard on just one truss and in doing this work I fell off the ladder and Raymond tore a tendon in his foot.

The day following the public holiday I made a distress call for help to our home handy man, RayM, who offered to come the following Tuesday to do the work on the trusses.

On Tuesday 22 June RayM duly arrived at 7.30 am. By lunch time he had sheeted the remaining two roof trusses with plasterboard, put 100 mm wide timber under each of the five steel angle braces and sheeted all five with plasterboard. While we were having lunch RayM says to me “You certainly made a fine fist of the plastering. I don’t want to knock all the hard work you have put in BUT you haven’t done it correctly. I’ll show you how it’s done after we have lunch.”
RayM at work sheeting the remaining trusses. 22/06/2010

All plasterboard work is now complete. 22/06/2010

Plasterboard sheeting is complete including the angle braces. 22/06/2010
After lunch, suitably chastened, I watched as RayM sanded down all the joints around the walls (except the four corners) then applied the second coat of plaster over the smoother surface. “That”, he says “Is how you do it”. I looked at his handiwork. “Smooth as a baby’s bum” I thought.

He had completed all four walls in just under 3 hours. I had taken days to do the same task and not to as high a standard.
RayM spent the afternoon rectifying my mistakes in the plaster joints around the walls. 22/06/2010
I now only have to sand the first coat of plaster on the four corners and the ceiling and then apply the second coat, although RayM promised he would come back to do it if I was not confident. Once the ceiling and corners are redone, we agreed that he would come back to put the final coat of plaster on the whole shed.